Sunday, July 28, 2013

DIY: Beginning of School Teacher Gift: Recess Baskets

Every year, on the first day of school, my daughter and I bring a gift to her  new teacher.  I have found not only does that bring a smile to her teacher's face, but I believe it helps calm the first day jitters for my daughter as well.   Our gift is generally the same each year - recess equipment and a personalized container that matches the teacher's room décor.

I found the playground balls at Wal-Mart and the other items at Target.  The ones at Target were on clearance, so definitely a good buy ($1 to $3 for each item.)  The container was a bit more difficult to fine, a summer-long hunt, but a good buy as well.

 If you choose this project, you want to consider not only the size of the container, but the weight as well.  Once it is filled with recess items, you don't want it too heavy for a student to tote.  Also, you want it large enough to hold all the items, but not too large so that it will take up too much space in the classroom.  I was so excited to find this green bucket/basket at Wal-Mart for only $7.  It is made of a light-weight, flexible plastic. 

 
In the past, I've gotten a friend to do the personalizing for me, but this year I plan to use my new Cricut.  My parents actually gave this to me as a Christmas gift two Christmases ago, but I just haven't found the time (I wonder why) to play with it.  So this will be my second project using it.  I chose the pink vinyl to compliment the green the container. 
 
The container I had been using in my own classroom was in need of a serious makeover, so I decided to make one of these for myself.  The sale prices were so awesome, that I also bought additional recess supplies for my students as well. 


Here are the two finished Recess Baskets, but as you can see, the name of on my daughter's basket is covered up.  I did that on purpose.  At the time we made them, my daughter did not know which teacher she was going to get. 

 
We, the teachers, have already begun pre-planning, and my daughter's teacher has called to let her know that she is in her class.  The surprise is out, so now I've been able to put her name on her basket. 
 
Its already for the first day of school! 

 
Classroom DIY

Friday, July 19, 2013

Friday FREEBIE and Beginning Days of School Packet


I have less than one week before I go back for preplanning.  If you've been following my posts, you'll know that I am already in planning mode, working on items for the start of school.


 This packet includes: class posters for common procedures around your room, including a class rules poster. It includes 4 great first day activities and fun homework activities! There is a weekly behavior chart, behavior incentive charts, a student information sheet and 5 weekly themed newsletter formats including Christmas and Valentines' Day.

For each product, there are full explanations as to how to implement it. For example, I've included behavior incentive charts and awards and have provided a full explanation for implementing this behavior management system. Other detailed descriptions are also included.
 
If you are just beginning to teach or if you are just looking for something new, I think you'll love this!
 
********************************* 

 I have a great FREEBIE I want to share with you.  This newsletter template is one from my Beginning Days of School packet featured above.


If you can use it...

  1. follow my blog,
  2. like my facebook page and then click on the picture below to get your free copy.


Freebie Fridays

Wednesday, July 17, 2013

DIY: Making My Student Binders

Earlier this month, I posted the cover I use for my student binders - a FREEBIE.  I had such a positive response and requests to show the complete student binder, so I took pictures all along the way as I put them together.  If you are trying to decide whether or not to use binders, let me explain why I feel it an important investment of my time and resources.


First, I want to provide ONE location which holds everything.  When my students pack their book bags, it is too easy to leave something out.  The same is true when they pack their book bag the night before at home.  If their written assignment, completed homework, study cards, notes from parents or teacher, order forms and money are in many possible and different locations, something can be overlooked and even lost.  Instead, this binder system helps the student stay organized by providing a specific labeled location for everything in one location.


Second, I want to provide a place where parents can locate my newsletter regularly. In years past, prior to using this binder system, I would send home our school newsletter as well as my classroom newsletter with weekly papers.  The problem was that the newsletter went home one week out of the month and often parents put weekly papers in different locations, so when they need to refer to the newsletter for info, they have to hunt for it, and sometimes don't find it.  In my binders, I include a clear pocket protector labeled "newsletters" for both school and classroom newsletters.  I have my students slide them in at the beginning of the month, where they stay there until the next month when I had out new ones. 

Third, I want to provide a resource location for study cards.  In years past, I would tell students to study their multiplication facts or vocabulary cards, but all too often, they were either left in their desk or at home and eventually lost.  In the binders, I include a clear, zipper pouch where parents can regularly find these resource cards when parents have extra time during the week to review them with their student.  Inside we keep our science or social studies unit vocabulary cards or our multiplication cards.  At the end of the unit, they put them in their weekly folder to go home for good.  Generally, the multiplication cards stay since we work on speed fluency once the facts are mastered. 

Fourth, I needed a specified location to look for notes and money sent to school.  Without a special place designated for money and notes, parents put these important items in various locations (book bag pockets, lunch box, etc.).  I use parent volunteers each morning, to help with checking in homework and other "housekeeping" duties.  Students open their binders first thing and leave them open on their desk until someone checks for notes, money and homework.  For this purpose, I put a label in the very front pocket so it will not be missed. 

Fifth, I want the homework to be done, not on loose paper, but on the paper that is bound in the three rings, not to be removed until the student is back at school.  In the back of the binder I included notebook paper and a pocket for homework handouts.  If homework is in a separate location other than this binder, it is likely that it may be left at home.  In my binders, the agenda (where daily assignments are written) as well as homework handouts and/or notebook paper for homework is kept in the binder.  Except for worksheets, homework is not taken out of the binder.   Worksheets have a labeled pocket as well, in he back.


Now, if I 've persuaded you to take the leap and try binders, keep reading and I'll lead you through it.  Here are the materials you'll need: 
  • 1 1/2 inch binders with clear insert pocket on the outside front (I prepare 24, which includes a few extra for possible new students)
  • lots of notebook paper (maybe 8 packs = one pack per 3 binders)
  • a package of sheet protectors
  • clear zipper pockets that have holes to fit in a three-ring binder.
  • Labels (5 sheets)


1st step: Make copies of your binder cover. 
 I use colored paper since it is more economical that using colored ink.


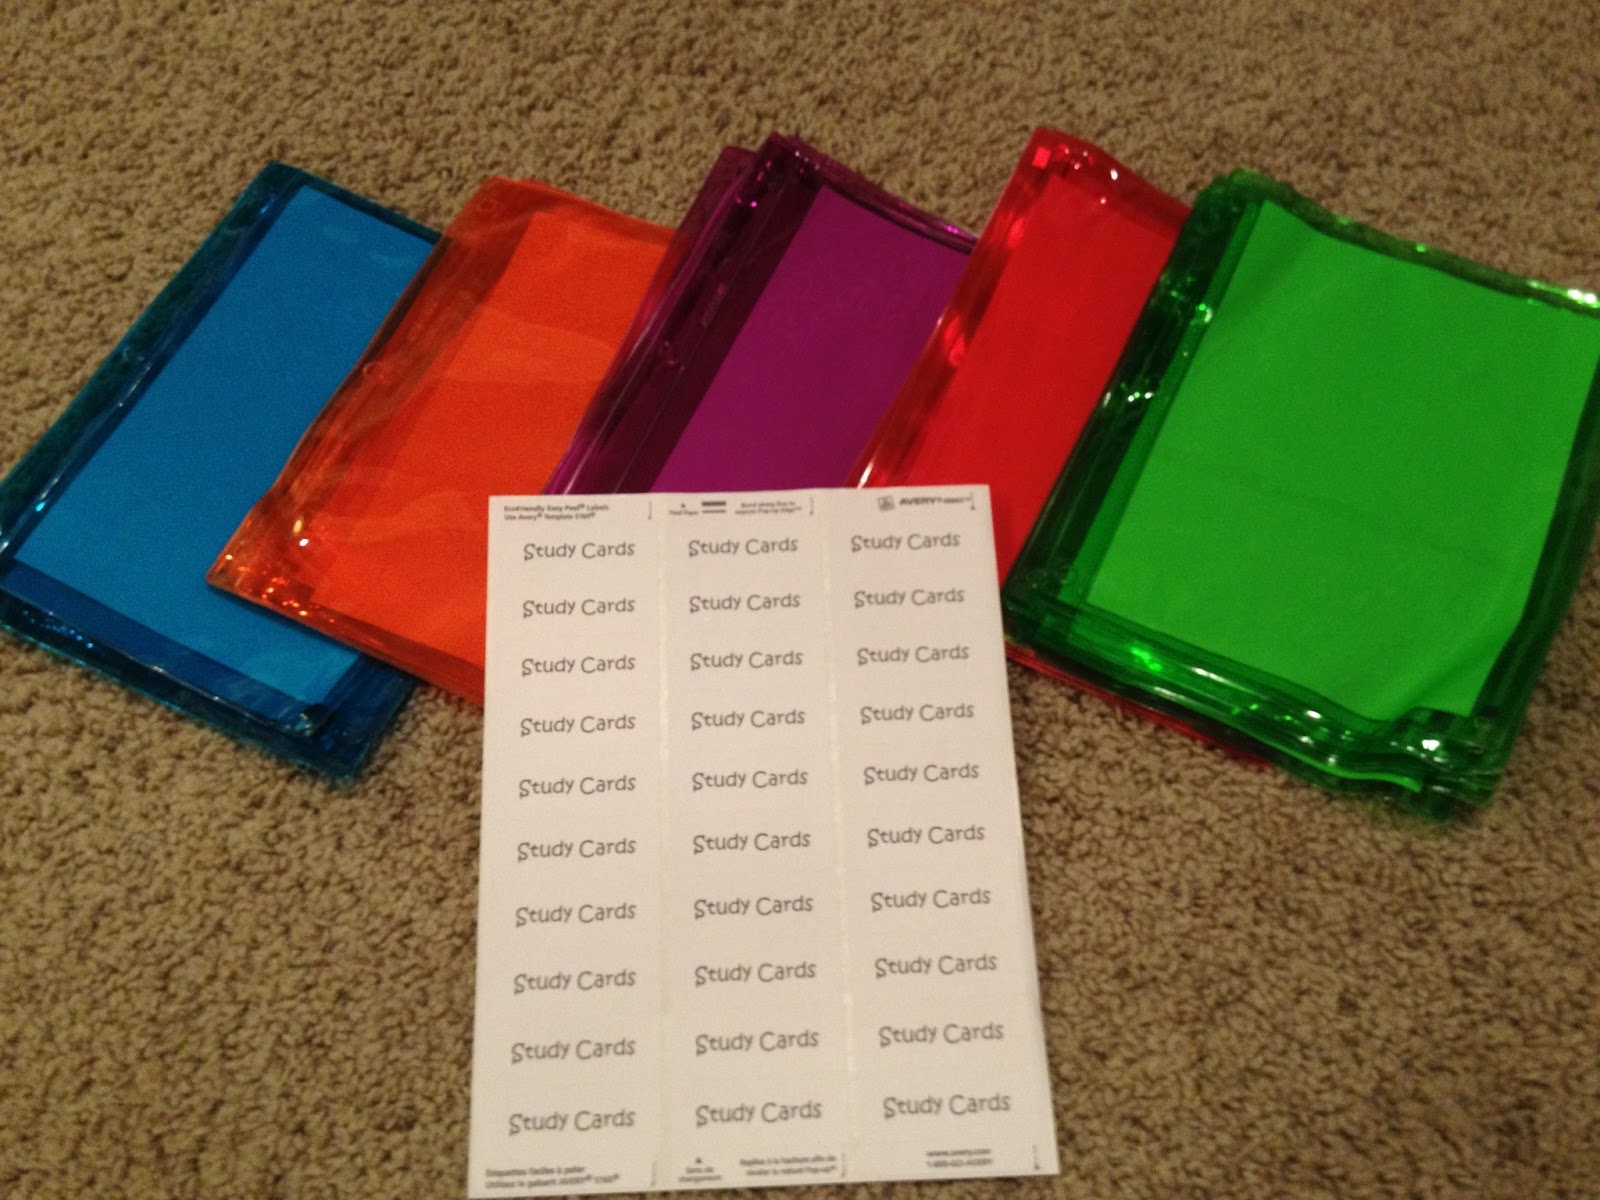
2nd step: Print all the labels you will need: 
Study Cards
Homework Handouts
Newsletters
Notes/Money


 3rd step:  Attach the front and back pocket labels and add notebook paper.  The "notes/money" label goes on the front inside pocket.  I attach the "Homework Handouts" label on the side of the right pocket, where I can still see the "Homework Handouts" label, after inserting the notebook paper.  


4th step:  Attach "Newsletter" labels to the page protectors and insert into the binder on top of the notebook paper.


Step 5:  Attach "Study Cards" labels to clear zipper pouches and insert them on top of the newsletter. 

I found these in color this year from Wal-Mart for only 47 cents. 


Step 6:  Insert your school's agenda/organizer/assignment notebook
 
Since we don't have this year's agendas until we return to school,
I inserted the one my daughter had from last year to show you where it is located. 
It fits between the zipper pouch and the notebook paper. 


Step 7:  Insert your binder covers.


And...you're done!
 
Click HERE to get your FREE copy of the binder cover page that I use.  You can add your name at year at the bottom. 
 
 
Classroom DIY
 

Throwback Thursday - Common Core Language Resources

My Throwback Thursday post goes back one year ago to July 3, 2012.  It was titled, "Common Core Language Resources".   Last year Common Core was so new to so many.  I am so glad we have had an extra year's experience with Common Core now. 

Today I am linking up with
Mrs. Carroll from The First Grade Parade  for
Throwback Thursday!

Original Post
**********************************
Have you begun thinking about what materials you plan to use
next year in order to meet the new Common Core State Standards? 

Here in Georgia, and in our school district, we are implementing the new standards in both Reading and Math, so my head is definitely spinning. 

As I've been planning and looking at our new standards to get ready for next year, I thought it would be helpful to list the CCSS for products I have on TPT.  I decided to start with my products that meet  CCSS Language Standards.

Click on these pictures for Common Core lessons or products...
The CCSS is listed with each one.

All There is to Know About Verbs
3.L.1. Demonstrate command of the conventions of standard english grammar and usage when writing or speaking.
a. Explain the function of nouns, pronouns, verbs, adjectives, and adverbs in general and their functions in particular sentences. 
d. Form and use regular and irregular verbs. *
e. Form and use the simple verb tenses
f. Ensure subject-verb and pronoun-antecedent agreement.


Verbs!  Grammar Games 
3.L.1. Demonstrate command of the conventions of standard english grammar and usage when writing or speaking. 
d. Form and use regular and irregular verbs.
e. Form and use the simple verb tenses. *
f. Ensure subject-verb and pronoun-antecedent agreement.


Snowy Adjectives

3.L.1. Demonstrate command of the conventions of standard English grammar and usage when writing or speaking.
a. Explain the function of nouns, pronouns, verbs, adjectives, and adverbs in general and their functions in particular sentences. *  
d. Form and use comparative and superlative adjectives and adverbs, and choose between them depending on what is to be modified.


How and When to Use Commas

3.L.2 Demonstrate command of the conventions of standard English capitalization, punctuation, and spelling when writing.
b. Use commas in addresses.
c. Use commas and quotation marks in dialogue.


Idioms Pirate Treasure Hunt
3.L.5. Demonstrate understanding of figurative language, word relationships, and nuances in word meanings.
a. Distinguish the literal and nonliteral meanings of words and phrases in context.

Multiplie Meaning Words

3.L.4. Determine or clarify the meaning of unknown and multiple meaning word and phrases based on grade 3 reading and content, choosing flexibility from a range of strategies.
a. Use sentence-level context as a clue to the meaning of a word or phrase. 


I'll list more products aligned with their new Common Core State Standards soon.


Tuesday, July 16, 2013

An Awesome School Fundraiser!

Looking for a great fundraiser for your school?  My husband just came in today and told me about this great opportunity offered by his company, World Pay.  Just so you know who that is, World Pay is the nation's 2nd largest Credit Card Processing company with familiar customers such as Google and Apple.  Anyway, here is the awesome fundraising opportunity...

World Pay will donate 10% of their profit of all business from members in your organization that use World Pay as their credit card processor.  This can easily amount to BIG money for your school or other organization.  Just announce this as your fundraiser at your next PTO or school council meeting, then send out flyers and contact parents in your organization that are small business owners who accept credit cards for payments in their company.  Provide them the attached contact information, and if they sign up with World Pay, your school will be the beneficiary of 10 % of the profits World Pay makes from them.  The more small business that sign up, the more money your school makes.  No more selling candy, magazines or wrapping paper!  Yea!!!

I've made up this flyer for your convenience or make one of your own. Here it is in color and in black and white. 

Here is the black and white version.  Click on either picture and get both.
 

Monday, July 15, 2013

My New Document Camera!!!

I am sooooo excited!   One day last week, I went back to my classroom to unload some books I had purchased over the summer, and to my surprise, sitting on my desk...

was a brand new document camera!!! 

To get excited of a piece of machinery, must make me the biggest nerd on the block, but oh well - I love it, and can't wait to use it! 


I starting making a list of what I can use it for, and got to thinking that others might be in the same "wonderful" situation and need some ideas for using this awesome machine. 

This little piece of equipment can show small items, text, and demonstrations in a much bigger way, not to mention it can reduce the need for copies.  Instead of copying 25 quizzes, you can just place the quiz under the document camera and have students record their answers on a piece of paper or use clickers if your school has them.

Here is a bulleted list of ideas, but I'm sure you'll think of other useful ways to put it to work for you.
  • show science experiments or observations
  • zoom in on a small object (i.e. rocks)
  • make any text viewable to the whole class
  • turn any book into a "Big Book" for shared reading
  • model handwriting (cursive)
  • work with a hundreds board
  • show a manipulative demonstration during math class
  • show your geoboard, as students follow along with theirs
  • reuse materials used on that old overhead projector we used years ago
  • use letter tiles or magnets for work
  • scan items and save images into the computer to be used at a later time
  • saved images or work done in class can be uploaded to the class website for parents to see
  • show maps
  • how to count money
  • Daily Oral Language, paragraph structure and editing
  • point out "teacher pics" from your book order for students to consider
  • create graphs
  • students can place their sticky notes underneath so all can see their reading responses and thoughts
Now, a new task...to organize an efficient work area to use it.  I know I'll need to keep commonly used math manipulatives nearby, lined paper and graph paper, my thinking maps and other small anchor charts, money, as well as enough space to lay an book open underneath.

I can't wait to use it!

For those of you who already have one, I'd love to know how you use yours.

Sunday, July 14, 2013

DIY: Making Chevron Subject Frames to display my Standards and EQs


Chevron seems to be the BIG RAGE this year!!!  Although I saw it last year a bit, it has really taken off and now, I see it everywhere.  Here are just a few photos I took at Wal-Mart this weekend in the School Supply section, of all the things Chevron.

Great throw-pillows for a comfy reading area
 
Composition  notebooks already cut in half for those of us wanting a smaller version. 
 
Adorable tin buckets that indicate they can be written on with a dry erase marker.  There are so many uses for these.  I use them to put in names of students "caught doing good"  each day, for a drawing at the end of the week.  I also use these tins to hold popsicle sticks with student numbers written on them, for me to use to call on students. They are just the right size to hold crayons, markers, sticky notes, highlighters, glue sticks, center manipulatives, and more.
 
I love this index card holder.  Great for student vocabulary or flash cards.  A good choice for holding note cards for anecdotal records, especially for a teacher who travels from class to class.  I can see using one of these per class.
 
 
These are soft, fuzzy pencil pouches with a zipper pull.  Aren't they adorable?!  My daughter would love having one!!!  However, she likes to do her "own" school supply shopping, so when I take her, I'm betting she'll ask for this.  :-)
  
I found bulletin board boarders from Creative Teaching Press that sell for only $3.99 on page 40 of their magazine that just came out this month.  I plan to pick up a couple of these packs.  One package contains 35 feet of boarder.  Not only do I use them on my bulletin boards, but I like to use them around my dry erase board too.  It really brightens up and frames that large, white space.
 
To continue this theme in my classroom, I have made Chevron Subject Frames for use in posting my standards and essential questions for each subject. 


I found this original idea on Pinterest, where colored paper was put inside a frame and hung for standards to be written on the glass.  I felt there needed to be a white section directly behind the standard, and that the colored pattern would not distract from the text and make the standard difficult to read. 


 I just finished making these Chevron Subject Frames for this purpose.
I left one left blank in case you have a specific subject that I haven't included.
 
Click on the image to get your copy.


I will continue to blog as I prepare for an exciting new school year


Blogging tips